Creating a product and adding photos
Where: Products → List a product
Before you begin
- Your SKU scheme is settled — a SKU cannot be changed after the product is created.
- Photos are ready as JPEG, PNG, GIF or WebP, under 25 MB, at least one sharp main shot.
Creating a product (saving a draft)
- Click List a product. The “List a product” dialog opens.
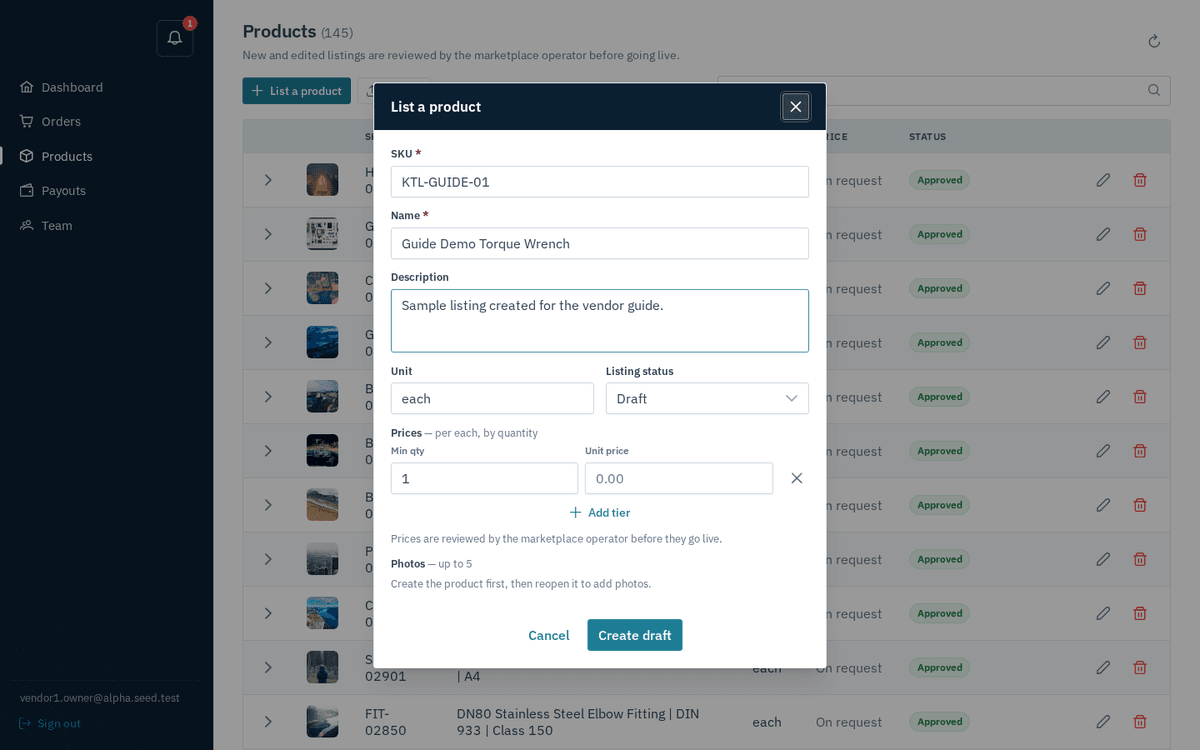
The List a product dialog — SKU, name, description, unit, listing status and price tiers
- Fill in the fields:
| Field | Required? | Notes |
|---|---|---|
| SKU | Yes | Your own product code. It must be unique in your catalog and cannot be changed later — the field is locked once the product exists. |
| Name | Yes | The title buyers will see. |
| Description | No | What it is, what it’s for, key specifications. |
| Unit | No | How it’s sold — defaults to each; could be metre, box, kg… Prices are always per this unit. |
| Listing status | No | Draft / Active / Disabled. Set Active when you want it on sale (once approved); Disabled takes an approved product off sale without deleting it; Draft keeps it as work in progress. |
- Under “Prices — per each, by quantity” build your volume pricing. Each tier row has a Min qty and a Unit price; click Add tier for more rows, or the × to remove one. Examples: one row “1 / 500.00” is a flat price; add “100 / 450.00” and buyers ordering 100 or more pay the lower rate. Rows without a price are ignored; a blank quantity counts as 1. Leave all prices blank and the product shows as “On request” to buyers.
note
The helper under the tiers says it plainly: “Prices are reviewed by the marketplace operator before they go live.” Your tiers are proposed prices — they only reach the storefront when the operator approves the listing.
- Photos cannot be added yet — the dialog says “Create the product first, then reopen it to add photos.”
- Click Create draft (disabled until SKU and Name are filled). You’ll see the toast “Saved as draft” — “Submit it for approval when you’re ready.”
Adding photos
- On the Products page, click the pencil on your product to open “Edit product”.
- Scroll to “Photos — up to 5”. Click the dashed Add photo tile and pick an image file; it reads “Uploading…” while it works. Repeat up to five images.
- To remove one, click the × on its thumbnail.
Rules and errors:
- Images only — JPEG, PNG, GIF or WebP. Anything else is refused with “Upload failed” — “Only image files are supported.”
- Maximum 25 MB per image.
- Maximum 5 photos per product — the sixth upload is refused.
- Rare network hiccups can surface as “Could not attach image” or “Could not remove image” — just try again.
tip
Products with a clear main photo convert far better, and low-resolution images are one of the most common rejection reasons operators give. Upload at least one sharp, well-lit photo before submitting.